Wednesday, February 29, 2012

its almost that time of year...

My favorite day of the year is rapidly approaching. What day is that? The DC 101 Chili Cookoff my friends.  For those of you who don't know I am part of an amazing chili team, aptly named Maryland MANS Chili (for Michael, Alexis, Nicole & Steve).  We've competed for a few years now, with life getting in the way every other year making it so we can't make it. But this year we will be there.  Last time we competed we placed 5th place overall - this year it's time for us to make it to the stage for an award.

This weekend starts the beginning of making test batches of chili. We'll see if I am willing to post the final recipe on the blog at a later date (it's not a decision I am able to make on my own...there are people I must consult with). In any went I'll let you know how each batch goes.  In anticipation, today I became an actual card-holding member of the International Chili Society. Now we can not only compete in the people's choice chili, but also salsa and chili verde.  I can't wait to get my card and scroll in the mail. Expect to see pictures...

Tuesday, February 28, 2012

who doesn't love sangria?

This weekend while having some friends and their adorable 1 year old over I made my favorite sangria recipe. Sangria is one of those things that always makes me happy. It makes me feel like it's a warm summer day and I'm sitting outside, relaxing in the sun. It brings me back to my honeymoon in Spain. In case you can't tell, I love sangria.

Here's the recipe that I use - it's a combination of a few sangria recipes that I've played around with a bit - it's potent and definitely doesn't taste that way :) This recipe makes a large pitcher of sangria - invite some friends over and drink the night, or day, away...

Red Wine Sangria
2 bottles of red wine  (it doesn't, and shouldn't, be an expensive wine. Get something decent to drink, but not over $10.  to be traditional, use rioja - a spanish red wine - if you don't have rioja go for any red wine you like)
1 cup brandy
1 cup triple sec
1 - 1 1/2 cups of simple syrup (combine equal parts water and sugar in a small sauce pan and heat up until the sugar dissolves. cool completely)
2 cups juice (I use either a pomegrante - blueberry juice blend or orange/peach/mango juice from tropicana)
slices of orange, grapefruit, apple, strawberries, blackberries, pomegranate seeds, pineapple pieces, etc - any fruit you like

Combine all of the ingredients in a large pitcher, stirring well to combine. Refrigerate overnight.


Sunday, February 26, 2012

back to basics - tomato sauce

There are a few things that every home chef needs to know how to make.  I will be starting a variety of "back to basics" posts on these basic recipes everyone should know how to make.  Tomato sauce is the first of these.

When I started cooking more, one of the first things I started making on my own was tomato sauce.  I have never really liked jarred tomato sauces - I've always found them too sweet, too caloric, and just not tasty.  The only jarred sauces I like tend to be the most expensive ones, and that's not helpful for someone who is trying to save money.  So I started making sauce and haven't bought a jar since then. Here's the recipe - whats great about it is that this is a base recipe that you can alter and change depending on what type of sauce you want.

Basic Tomato Sauce
1 can of whole tomatoes in puree, or 1 can of tomato puree
1/2 large onion, cut in a small dice
1 clove garlic, finely chopped
1 tbsp tomato paste
salt/pepper
1 tsp dried thyme, basil, and/or oregano

Instructions
Saute the onion in a sauce pan in about 2 tbsp olive oil until its translucent. Add the garlic and sauté one minute until its fragrant, but be careful not to burn it.

Add the tomato paste and sauté 1-2 minutes to let the flavor develop.  Add whatever dried herbs you are using and mix through.  Add the can of whole tomatoes or tomato puree. If using whole tomatoes, break them up with your spoon (or a potato masher) carefully after adding into the pan (be careful because they will splatter).  Add about 2 tsps salt and 1 tsp freshly ground black pepper to the sauce and bring it up to a boil. Reduce to a simmer and partially cover the pan, letting it simmer for about 1 hour.

Variations
This recipe is easily doubled or tripled - I usually make a large batch of sauce and then freeze whatever I don't use right away in small containers in the freezer. Once you have this down, you can switch it around for whatever type of sauce you want.  For a basic tomato sauce, if you have fresh herbs use them instead of dried.  If using fresh herbs, use one tablespoon instead of one teaspoon of them. Fresh thyme or oregano can go in in the beginning of the cooking.  Fresh basil should be added towards the end so it stays fresh.  If adding fresh basil you can add as much as you want - pretty much you can never have too much fresh basil.

Tomato Basil Sauce - basic tomato sauce with about 1/2 cup of fresh basil added in the end.
Arribiata Sauce - a spicy italian tomato sauce - add about 1-2 tbsp red pepper flakes (depending on how spicy you want the sauce) in the beginning of the cooking process after adding the tomato paste.
Creamy Tomato Sauce - add 1/4 cup cream to the basic sauce and puree the entire sauce.  Once the cream is added be careful not to bring the sauce up to a boil or else the cream might separate.
Vodka Sauce - add about 2 tbsp of vodka to the sauce before bringing it to a boil. Once the sauce simmers for about an hour, add 1/4 cup cream and then puree the sauce.
Meat Sauce - start the sauce by browning your meat of choice ( I use either 1/2 pound of sauce out of the casings, ground beef or ground turkey).  Once the meat is browned and cooked through follow the basic sauce recipe.

The possibilities are endless for whatever you want to do with a basic tomato sauce recipe.  So go throw out those old cans of Ragu and start making your own sauce. It makes a huge difference in your cooking, and it's easy to make. Enjoy!


Monday, February 20, 2012

no waste

First, for the four or so readers of this blog I apologize for the delay between posts.  Still getting the hang of this thing, but I do promise to get better about posting more often.

Moving on: the title of today's blog post is our household motto.  I hate wasting any sort of food - hate it when food goes bad and we have to throw it away.  So while trying to think of ways to save money and to avoid wasting food, I realized that we could start making our own vegetable stock.  Even Steve was skeptical at first, but after realizing there was nothing to lose in trying it out, he became a veggie stock convert. We've previously made chicken stock before (which I'll post about soon enough), but veggie stock is the perfect example of no waste.  So what do you use for veggie stock? I made it this weekend while visiting some of my favorite people in Boston. While cooking the stock it started being called garbage soup. While that's not really an appetizing or totally correct name, it worked.  The whole idea of making this stock is to use up veggies that are about to turn bad or get thrown away, and to use up the waste ends of veggies after you've used them for whatever other dish you've made (think carrot peels, garlic skins, onion ends).  The result? Delicious homemade stock that you can use for anything you want. To add more flavor in my day to day cooking I use stock in place of water in almost everything - when making rice, quinoa, soup, couscous, etc.

So how do you go about making veggie stock? What I do is keep a gallon zip lock bag in the freezer. Here's what it looks like:


Don't mind the freezer burn. It's okay.  On Sundays when I do the majority of my big cooking, I take the bag out of the freezer and put my food waste/extras in there.  During the week as I cook and have anything that can go in there, I pull the bag out and throw whatever I have in there.  I make veggie stock every weekend or every other weekend - depends on the amount of veggies I have in the bag.

Many veggies are good to use in stock, but there are some that aren't so great, so here's a list of both.

Good for stock:
- onion ends/ peelings (skins too)            - any left over herbs/ herb stems
- garlic ends/ peelings (skins too)            - fennel
- carrot ends/ peelings                             - mushroom stalks
- celery                                                   - broccoli stems
- asparagus stalks

Bad for stock:
- potatoes                                - cucumbers
- beets                                     - kale
- broccoli rabe

As you can see you can use pretty much any leftovers in your stock.  On the "bad" list I put kale and broccoli rabe because they would be too bitter in the stock.  You also don't want any veggie thats too watery like cucumbers, or something that will take over the stock completely, like beets.

Directions:
Heat up a large pot and add olive oil to the bottom. Once that heats up, dump whatever you have in your freezer bag into the pot. Sauté the veggies for a few minutes - you want them to start thawing and to start to brown a little bit.  Once everything has been cooking for about ten minutes, cover the veggies with enough water to cover them with a few inches of water.  Add about 2-3 bay leafs, 6-10 peppercorns and a handful of salt. Bring the stock up to a boil and then reduce it to a simmer. Partially cover the pot and let it simmer for at least 2 hours, but as long as you have ideally, up to 4-5 hours.

Strain the stock through a fine mesh sieve into a large bowl.  Divide the stock into 2 cup containers and completely cool before storing.  Depending on what I'm making, I keep whatever stock I'll be using within a few days in the fridge, and leave the rest in the freezer.

That's it!

Sunday, February 12, 2012

One of the things I like to do is try to make healthy versions of things that I like to eat.  Ever since I began cooking I've strived to make healthy food that doesn't taste like it's healthy. Don't get me wrong - I like to indulge, but I also really love to eat, so I've always had the mindset that if I make it healthy I can eat more of it.  Not always the best plan, but it works for me.  I'm always trying to make crusts healthier but its been difficult.  A significant amount of butter is usually required, and there's no real substitute that you can use instead of butter.  That in mind, I decided last weekend that I wanted to make quiche.  I've tried making crust-less quiches before, but it wasn't great. You really do need the crust.  I decided to try to make a crust using quinoa.

I love quinoa and am always looking for new ways to use it.  If you haven't cooked with it before, go out and buy some now.  Quinoa is considered a grain but it's actually a seed.  Once it's cooked it tastes nutty and each of the grains have a little crunch when you don't overcook it.  Not only is quinoa yummy, it's also incredibly good for you.  It's packed with essential amino acids, protein, calcium, iron...you name it. It's considered one of the healthiest single foods out there.  So instead of making a quiche with a butter rich pastry dough, I decided to give a try to making a quinoa crust. The crust can be made a day ahead - just bake it off, cover with plastic wrap and keep in the fridge.  The veggies listed below are what I used, but by all means swap them out and use whatever you have on hand.  This recipe is a great way to use leftover veggies, so don't feel bound by what I used. Just cook whatever veggies you are planning on using before putting them in (besides fresh spinach).

Vegetable Quiche with Quinoa Crust

For the crust
1 cup quinoa
1 1/4 cup vegetable or chicken stock
1/3 cup oatmeal
2 tbsps flax seeds (if you have - if you don't have these you can leave this out)
3 tbsps slivered almonds (any type of nut will work here, that's what I had on hand)

For the filling
8 eggs, beaten
2 tbsps milk
1 tsp dried thyme
2 cups steamed broccoli, chopped
1 cup cooked sliced mushrooms
1 handful spinach, chopped
1/4 cup shredded cheddar cheese (or any extra cheese you have on hand)

To make the crust, combine the quinoa and the stock in a small sauce pan.  Bring to a boil and reduce to a simmer. Add about 1 tsp of salt to the stock once it comes to a boil. Cook the quinoa, stirring often, until all of the stock is absorbed. This will take a little while. It will look like you don't have enough liquid in there but it'll be fine.  Once all the stock is absorbed turn off the heat and cover the pan and let it steam for 5 minutes. Allow the quinoa to cool enough to be able to handle.

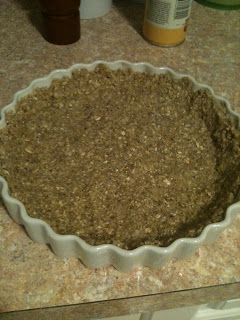
Put the oatmeal, flax seeds, and nuts in a food processor and grind them until it resembles the consistency of flour. Combine the oatmeal mixture with the quinoa.  The quinoa should be moist enough where you won't need to add an egg to the crust.  If for some reason the quinoa is very dry, you might need to mix a little egg in to the crust, but I didn't need to.  Put the crust in a greased 9 inch pie pan, pressing it firmly into the pan and pressing it up the sides until it's even.  You'll need to wet your hands to keep the quinoa from sticking to your hands a few times during this.  Bake the crust at 350 degrees for about 10 minutes, or until when you touch the crust it's starting to dry out and harden a bit. Set aside. It should look like this:


To make the filling, combine the beaten eggs and milk.  Add about 1 tsp of salt, 1/2 tsp of fresh cracked pepper and the dried thyme (if you have fresh definitely use fresh - use about 1 tbsps of fresh herbs - you could also use whatever herbs you have on hand).  Put the chopped broccoli and mushrooms into the cooked quinoa crust. Put the chopped spinach into the egg and milk mixture and add almost all of the shredded cheese, saving a little to the side.  Pour the egg mixture over the veggies in the crust, moving the vegetables as needed to get the egg everywhere.  Put the remaining bit of cheese on top of the quiche.

Bake the quiche at 350 degrees for approximately 30-45 minutes, or until when you move the pan around the middle of the quiche is set and isn't liquid at all.  It works great for breakfast, lunch or dinner. Enjoy!


Wednesday, February 8, 2012

I heart samples

I love samples. They are some of my favorite things.  While I love going to Costco, the lines you have to wait in to get a sample chicken taquito are a bit frustrating.  So imagine my happiness when I went to a Bed Bath and Beyond that had a new foods market offering loads of samples with no lines.  One of the things that we sampled was a roasted red pepper soup made by Pacific Natural Foods.  It was amazing. Make Steve get his own sample and taste it amazing.  Walk back there when a new person was working the sample station and get a second sample amazing.

When we got home I decided to try to make it myself.  It's something I do a lot - eat something somewhere and then try to recreate it at home.  Fun, yes. Cheaper than buying it out, yes. A win win.  At BBB I scanned the ingredients list and figured the soup couldn't be too hard.  The ingredients were roasted red red peppers, tomatoes, and a few other things.  After picking up red peppers to roast, I set to making the soup.  Here's my first attempt at posting a recipe:

Ingredients
6 red peppers, 2 chopped and keep 4 whole 
1 medium size onion, chopped
3 cloves garlic (or more if you like)
3 cups chopped tomatoes (I had fresh and used them, otherwise use one can diced tomatoes)
6 cups chicken or vegetable stock
1/2 can tomato paste
2 carrots, chopped
2 tbsp sugar
1/3 cup cream (I used a fat-free cream to attempt to be healthy...although I don't really get how that's made)


Steps
Roast 4 of the bell peppers.  I broiled them because we have an electric stove, but you can also hold them over an open flame, turning them with tongs. Once the peppers are black and blistered all over, put them in a large bowl and cover them with plastic wrap.  Wait about 10 minutes or until the blackened skin peels easily from the peppers. Do not rinse them under water. If a little black stays on the peppers thats fine.

In a dutch oven or large pot sauté the onion, 2 chopped red peppers and 2 chopped carrots until tender.  Add the chopped roasted red peppers and garlic and continue to sauté.  Add salt (more than you think it needs) and pepper.  Add the chopped tomatoes. 

Add the tomato paste and sauté for about 5-7 minutes. Add the sugar and stir through.  Then add the chicken or vegetable stock. Bring it up to a boil and then simmer for about 1/2 hour (but it really can go for longer).  Turn off the heat and add the cream. 

Puree the soup until its completely smooth.  Taste the soup - it might need more salt...thats never a problem.  


It tasted very close to the Pacific Natural Foods soup..Just not as sweet, which I don't think is a bad thing. Enjoy! 


Monday, February 6, 2012

the first post

The first post... how exciting... This blog has been something that I've talked about for a long time. The idea has been thrown around multiple times with me pushing it aside or ignoring it for a while..."later" is always when I would start.  Why now? Why not. I love cooking.  More than love it. It's what relaxes me. If I could spend all my day cooking for people I would.  My law school loans wouldn't appreciate that however, so that won't be happening anytime soon.  But nothing makes me happier than cooking for my husband Steve (who you all clearly know since there's maybe four of you reading this) or cooking for my friends and family.  Maybe it's narcissistic - all I know is I love feeding people and seeing them happy eating the food that I made.

So now I'll try to share it with all of you.  I'll even try to figure out the amounts of ingredients that I put into everything for you. And of course as per Lex's request,  questions and comments are always welcome and encouraged.